
Pronto Xi ERP Software includes a Notice Board function that allows authorized users to post to an electronic bulletin board within the system. We often associate this function with system administration uses, such as advising of planned maintenance, or requesting users to logoff the system; however, the Notice Board function can and should be used for so much more:
- Promote company news, meetings and events
- Display reminders for single company or company-wide administrative tasks – for example HR and Payroll related to-do items
- Advise of process changes or provide quick notifications to users
The uses for the Notice Board are endless, and up to the imagination of those posting. Use the steps below to get more use out of your Pronto Xi Notice Board.
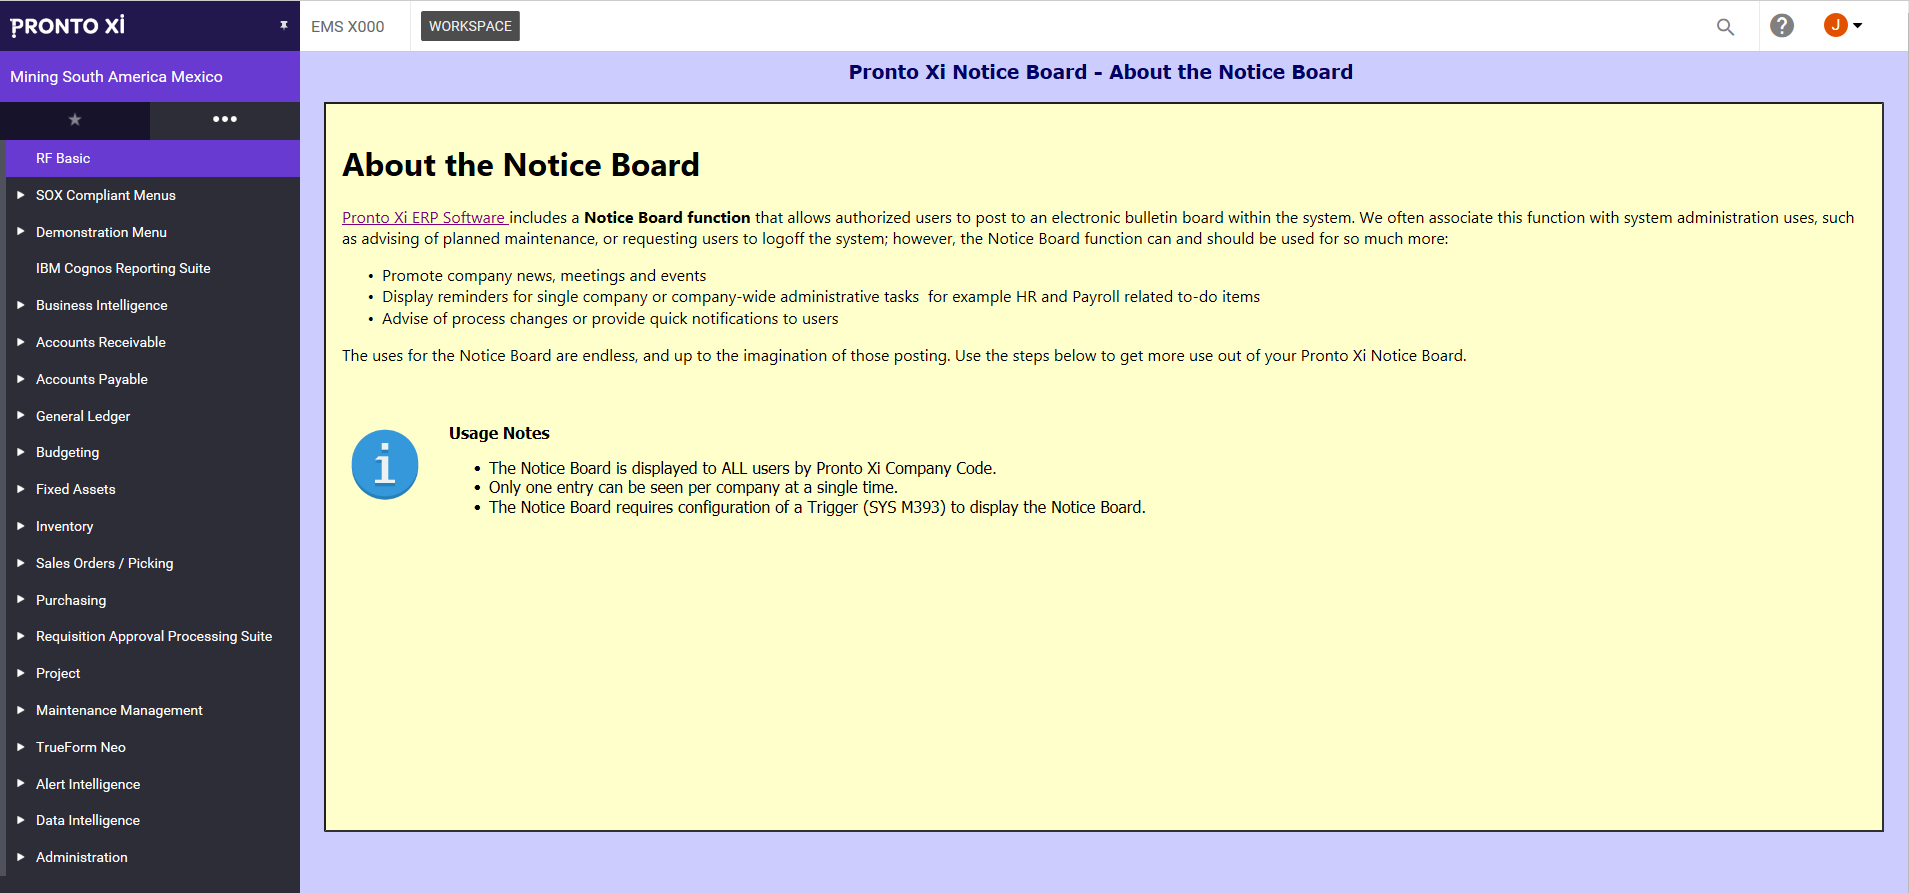
Figure 1: An example of an HTML formatted Pronto Xi ERP Notice Board. In this example, various fonts, font formatting, URL links, and images are present.
Usage Notes
|
Configuring a Pronto Xi ERP Notice Board Entry
From Pronto Xi ERP Software:
- Navigate to: Administration > System Administration > Notice Board Maintenance (SYS M023)
- Click ENTRY.
- Enter the field information as follows:
| FIELD | DESCRIPTION |
|---|---|
| Notice Code | Enter a unique code for the notice. |
| Company | Select the Company Code where the notice board will be applied. If the notice applies to all companies, leave blank. |
| Effective From | Enter the date that the notice will be in view for users. Enter 0 if the notice will be immediately effective. |
| Expires After | Enter the date that the notice will terminate and be removed from viewing. Enter 0 if the notice has no expiration date. |
| Notice Description | Enter a title for the notice. This description will be used as the title of the Notice Board. |

Figure 2: Pronto Xi ERP Software Notice Board Maintenance (SYS M023).
- Click TEXT.
- In the Text Entry window, enter the message body. Messages are created in HTML which allows for formatting, tables and images to be displayed. See HTML tips at the end of this blog.
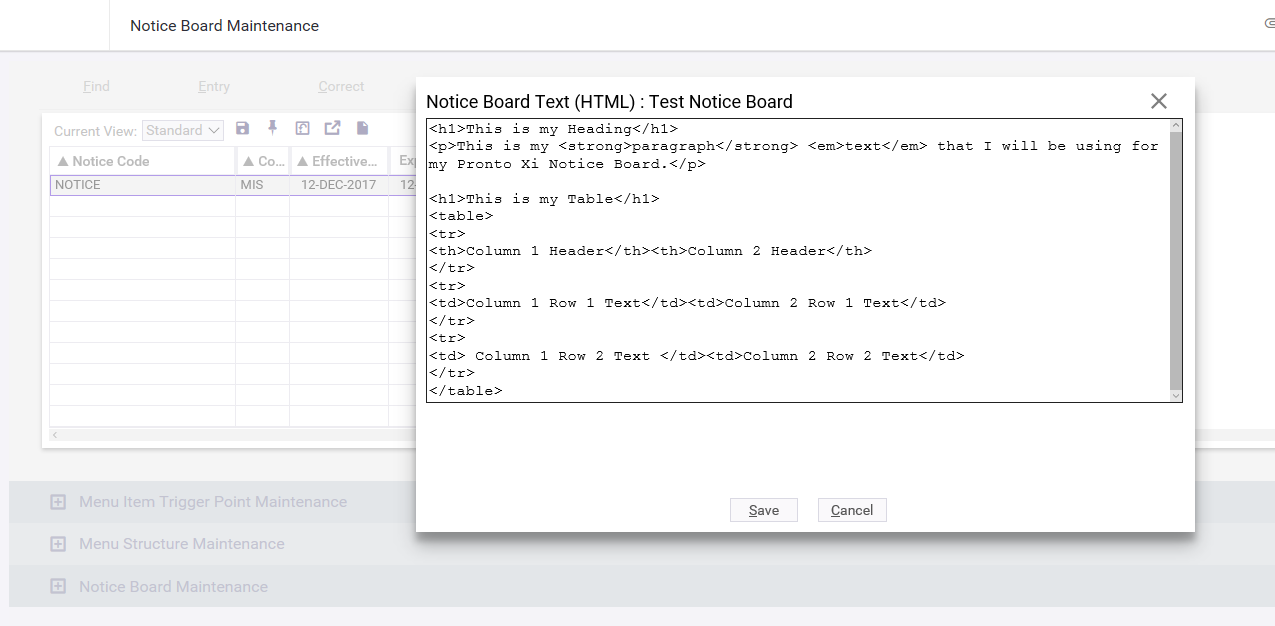
Figure 3: Pronto Xi ERP Software Notice Board Maintenance Text Entry. HTML is used to display fully formatted messages.
- Click SAVE to commit the Notice Board entry.
- To see a preview of your notice, click WEB PAGE PREVIEW. Your browser may prompt to either OPEN or SAVE the HTML page. Click OPEN. The message will appear in a browser window similar to below:
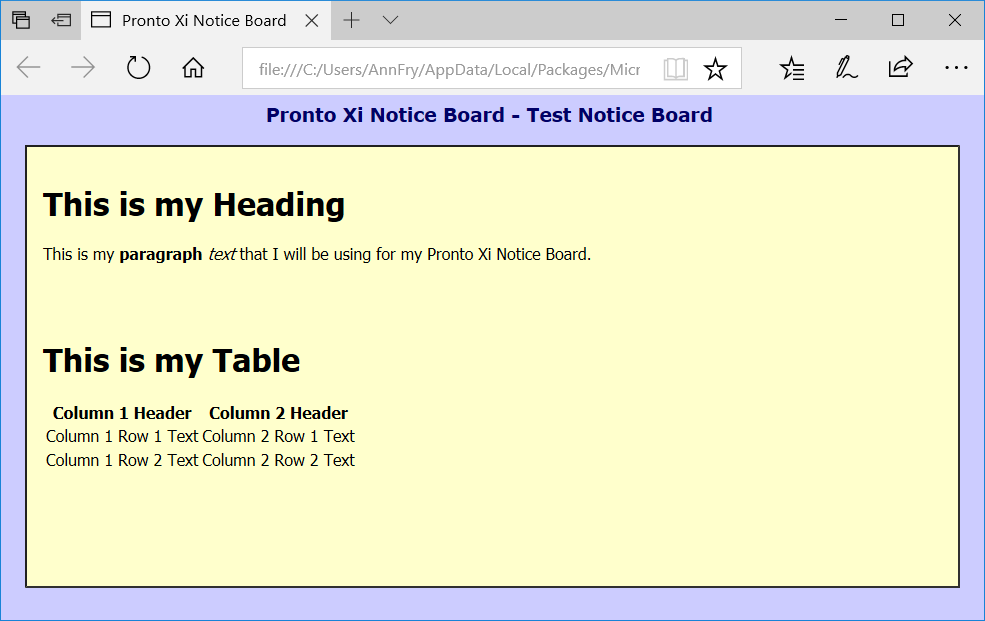
Figure 4: Pronto Xi ERP Software Notice Board Maintenance provides a Preview to review work prior to activation. Preview appears in an Internet Browser window.
- Close the Notice Board Preview.
- Close Notice Board Maintenance. The message has now been configured.
|
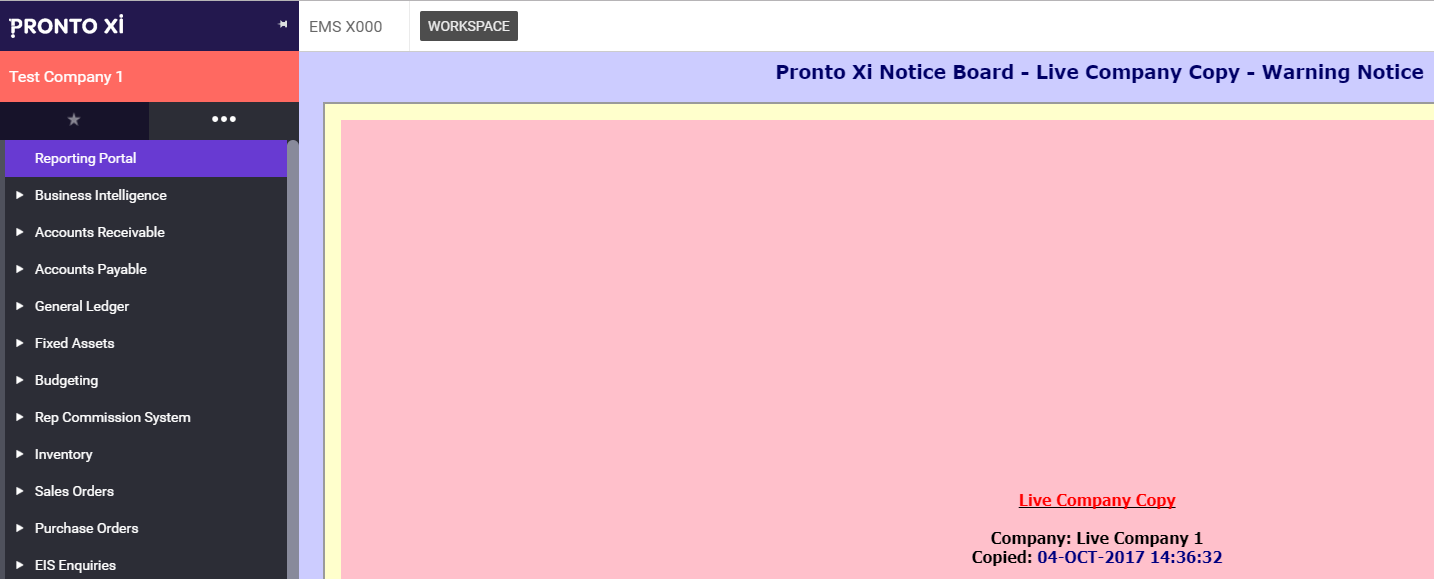
Use of the Notice Board in Non-Live Environments (Test, Sandbox)
In a non-LIVE Pronto Xi environment, the Pronto Xi Notice Board has an important function – it reminds the user that they are in a TEST Environment.
This Advisory Notice Board contains the name of the copied company, the as at date and a warning in a scrolling marquee that will advise each user that selects the company that it is a test company. Any existing notice board will not be overwritten. The created notice board will be called BACKUP and can be changed using the Notice Board Maintenance function. |
Triggering the Pronto Xi ERP Notice Board
With the Notice Board configured, the next step is to ensure that the message is triggered. This configuration is mostly done automatically from Pronto Xi.
-
- If you have not used the Pronto Xi Notice Board before, a trigger notification will be displayed when the Notice Board Maintenance function is closed. The prompt will be as follows:
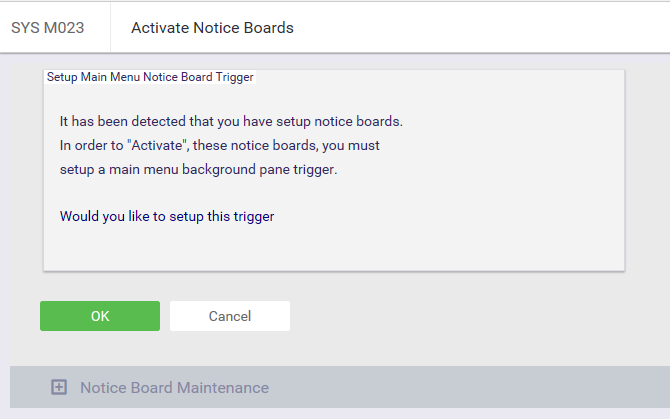
Figure 5: Pronto Xi ERP Software Notice Board Trigger Notification.
-
- Click OK.
- Pronto Xi will advise that the Notice Board has been activated.

Figure 6: Pronto Xi ERP Software Notice Board Trigger Activation Message.
-
- Click OK. The message should be now be active based on your selected dates and company codes. The Notice Board Trigger can be found in function SYS M393 > Triggers (Menu Item Trigger Point Maintenance).
- If you have used the Pronto Xi Notice Board before, the trigger should already be configured and the message should be active based on your selected dates and company codes.
- The configured Pronto Xi Notice Board will now replace the Workspace background image during the time period configured and for all users in the selected companies.
|
Advanced Bonus Tip: Customizing the Notice Board Template
The Notice Board background template can be customized. The file EMS_E003.htm can be found in the $BMS/templates directory. To customize this template, copy the HTML files to a $CUS/templates directory and modify the HTML code as required. The EMS_E003.htm template contains two data elements @TITLE and @TEXT. These two elements represent where in the template the data from the server is be placed. |
Notice Boards are a convenient and easy way to send messages to your Pronto Xi users. With the help of this tip, your Pronto Xi Notice Board can become a valuable tool in communicating information to your team.
Basic HTML Coding Tips for Use with the Pronto Xi Notice Board
Below are basic HTML coding tips to help you start creating Pronto Xi Notice Boards. HTML uses tags to denote text formats and layout. A tag will surround text – therefore, text should begin with an opening tag (e.g. <h1>) and a closing tag (e.g. </h1>).
| TAG | EXAMPLE |
|---|---|
|
Headings
To add a heading
Tag: <h1></h1>
|
<h1>This is my Heading</h1> |
|
Paragraph Text
To add paragraph text
Tag: <p></p>
|
<p>This is my paragraph text that I will be using for my Pronto Xi Notice Board.</p> |
|
Bold Text
To use bold format text
Tag: <strong></strong>
|
<strong>paragraph</strong> |
|
Italicized Text
To use italicized format text
Tag: <em></em>
|
<em>text</em> |
|
Table Formatting
To format a table the following tags are used. Each table element must be nested within each tag. Refer to the example.
Tags:
Table: <table></table>
Row: <tr></tr>
Column Header: <th></th>
Cell: <td></td>
|
<table>
<tr>
<th>Column 1 Header</th><th>Column 2 Header</th>
</tr>
<tr>
<td>Column 1 Row 1 Text</td><td>Column 2 Row 1 Text</td>
</tr>
<tr>
<td>Column 1 Row 2 Text </td><td>Column 2 Row 2 Text</td>
</tr>
</table>
|
In the Pronto Xi Notice Board example above, the HTML code used to produce the output was as follows:
|
<h1>This is my Heading</h1>
<p>This is my <strong>paragraph</strong> <em>text</em> that I will be using for my Pronto Xi Notice Board.</p>
<h1>This is my Table</h1>
<table>
<tr>
<th>Column 1 Header</th><th>Column 2 Header</th>
</tr>
<tr>
<td>Column 1 Row 1 Text</td><td>Column 2 Row 1 Text</td>
</tr>
<tr>
<td>Column 1 Row 2 Text</td><td>Column 2 Row 2 Text</td>
</tr>
</table>
|
For more help with HTML, visit: https://www.w3schools.com/html/default.asp
Special thanks to Dan Rector, ERP Solutions Consultant for providing assistance with this article.
Continue to visit our blog for more information about Pronto Xi and IBM Cognos reporting. PSA ERP consultants contribute tips and articles to our Insight page to help empower Pronto Xi users in completion of their daily tasks.
