
A simple but overlooked function in Pronto Xi ERP Software is the ability to modify the Pronto Xi Navigation Menu Bar based on frequently used functions or – Favourites. The use of a customized menu can increase productivity, enhance user adoption/training and can even provide a customized function list for users with similar corporate roles that is easier to navigate than the full standard menu.
| This instruction provides Favourites management in the Pronto Xi Web Client User Interface. Settings in the Pronto Xi Thin Client Application may differ slightly. |
Locating the Favourites Menu
The Favourites menu is accessed by clicking the star tab at the top of the Pronto Xi Navigation Menu. When selected the displayed menu will show the customized listing of links to Pronto Xi ERP functions. The same Favourites listing will appear in all companies that a user has access to.
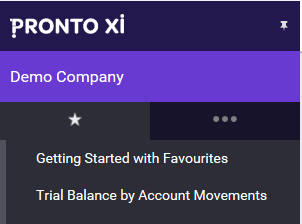
Figure 1: Pronto Xi Favourites Menu
| Favourites can only be maintained with the proper security settings in place for the user. If you do not have access to your Favourites settings, contact your System Administrator. |
Pinning the Navigation Menu
In the Pronto Xi Web Client User Interface, the Navigation Menu can be toggled to either collapse when a function is accessed, or remain in view. Use the Pushpin located on the top right corner of the menu to toggle between the collapsed and displayed menu.
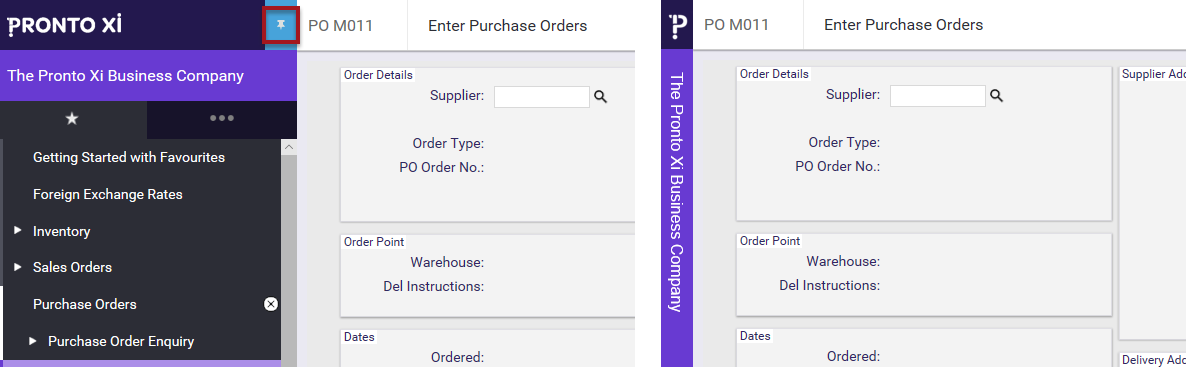
Figure 2: Pronto Xi ERP Software Navigation Menu shown in pinned and collapsed states.
2 Simple Methods of Adding a Function to the Favourites Menu
Method 1. From a Pronto Xi ERP Function
- Navigate to any Pronto Xi ERP Function
- Click ADD TO FAVOURITES (heart icon), located on the function name bar.

Figure 3: Add to Favourites option available from most Pronto Xi ERP functions
- Pronto Xi ERP will prompt with:

Figure 4: Successful addition of a Function to the Pronto Xi ERP Favourites Navigation Menu
- The function is now accessible through the Favourites menu.
Method 2. Using the Add Current Function to Favourites Option
- Navigate to the Pronto Xi ERP function to be added to the menu.
- From the Favourites menu, select ADD CURRENT FUNCTION (XX XXXX) TO FAVOURITES. (ADD CURRENT FUNCTION will include the current function name for easy identification and is typically located above the Organize Favourites menu item.)
Note: The ADD CURRENT FUNCTION TO FAVOURITES will only appear in the Pronto Xi menu when the current function is not already in the Favourites menu.
- The function is now accessible through the Favourites menu.
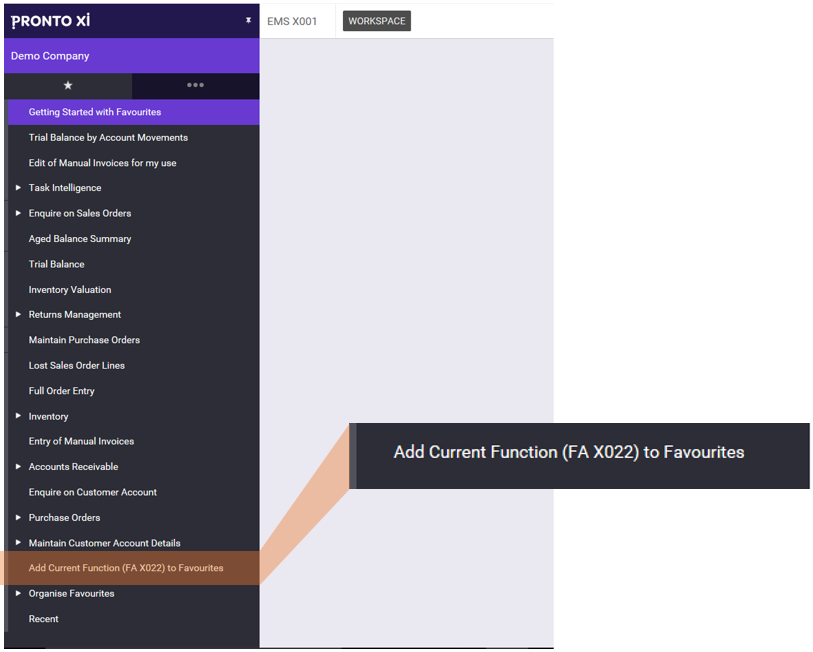
Figure 5: Add Current Function to Favourites Menu OptionOrganizing the Favourites Menu
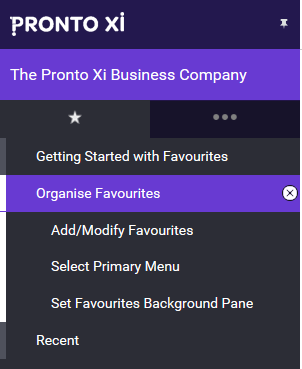 With additions to the Favourites Menu easily achieved, the next step is to organize Favourites into logical order and groupings based on tasks or specific user preference. This is accomplished through the Organize Favourites options which are also found in the Favourites menu.
The Add/Modify Favourites Function
The Add/Modify Favourites function (EMS M001) provides comprehensive editing of the Favourites menu. From this function, users can complete most tasks associated with Favourites customization. Most of these functions are self explanatory, however we will explore the most used items.
OPTION DESCRIPTION Add Item Add a variety of items to the menu including Pronto Xi functions, internal and external URLs and reports. Change Item Modify characteristics of an existing menu item. Rename Item Customize the name of a menu option. Change Icon Modify the icon for a menu item. Remove Item Remove a function from the Favourites menu. New Folder Create a custom folder to group functions. Execute Item Run selected menu item function. Data Grid Displays the Favourites menu in a datagrid for quick editing. Save Saves the current Favourites menu configuration. Using the Add/Modify Favourites Function
To begin organizing your menu, from the Favourites Menu, navigate to ORGANIZE FAVOURITES > ADD/MODIFY FAVOURITES (EMS M001)
 Figure 6: Add/Modify Favourites Screen in Pronto Xi ERP Software
Adding Various Types of Items to the Favourites Menu
- Adding a Standard Pronto Xi Function
In addition to the two simple methods to add functions above, menu items can be added through the ADD ITEM option in the Add/Modify Favourites Function.
- Click ADD ITEM
- Select STANDARD PRONTO XI FUNCTION from the Item Details options.
- Enter the MODULE and FUNCTION. In the example, Module AR and Function E001 was entered to add Enquire on Customer Account.
- Press ENTER. The description of the function will appear.
- Click OK to confirm the addition.
- Collapse Favorites to refresh and then reopen Favorites to review the change.
 Figure 7: Adding a Standard Pronto Xi Function to the Pronto Xi ERP Software Navigation Favourites Menu
- Adding a Pronto Xi Pre-defined Function Group
In certain instances, a user may require the full set of functionality for a particular area in Pronto Xi ERP. For example, an Accounts Payable Manager may require all tasks associated under the folder Accounts Payable.
-
- From the Pronto Xi standard navigation menu, locate the top level ‘folder’ item for the function group. In most cases they will be represented by the applicable module indicator and function ‘X001’. For example Accounts Payable (AP X001) or Project (PROJ X001).
- Follow the instructions above to add a Standard Pronto Xi Function, using the Module and Function for the required grouping.
Note: You cannot add menu items to a pre-defined menu group. To create a custom grouping you would need to add each item individually to a custom folder.
- Adding a User Defined URL
Adding a user defined URL provides quick access to external websites that are frequently accessed to complete daily tasks. This could include your company’s website, supplier and client portals, or simple business tools like exchange rate or address lookup.
-
- Click ADD ITEM
- From the Item Details options, select USER DEFINED URL.
- In the URL field, enter the URL (web address) in the URL section.
- In the Description field, enter a Title for the URL for display in the menu.
- From Window options, select how you would like the web page to be displayed.

Important Note: Adding URLs to Background Pane
To display a URL in the background pane, the URL must be of the same protocol as the Pronto Xi application (HTTP vs. HTTPS).If the protocols do not match, simply select the New Window option. When the Favourite is selected a new window will appear with the URL address rather than the page being displayed directly within Pronto Xi.- OPTIONAL: In the Icon field, select an icon to be displayed with the title. The icon will NOT appear in the Favourites menu, but will be in view in the Add/Modify Favourites function.
- Click OK to confirm the addition.
- Collapse Favorites to refresh and then reopen Favorites to review the change.
 Figure 8: Adding a User Defined URL to the Pronto Xi ERP Navigation Menu
- Adding an IBM Cognos Reporting URL
IBM Cognos reports can also be added to the Navigation menu. Full details for adding these reports are included in a recent blog which can be reviewed here.
Reordering Menu Items
Reordering menu items can assist a user in laying out daily tasks in execution order or reordering functions based on similar tasks.
- Select the Menu Item.
- Using the arrow keys, position the item in the desired order.
- Repeat steps to reorder other items.
- Click OK.
- Collapse Favorites to refresh and then reopen Favorites to review the change.
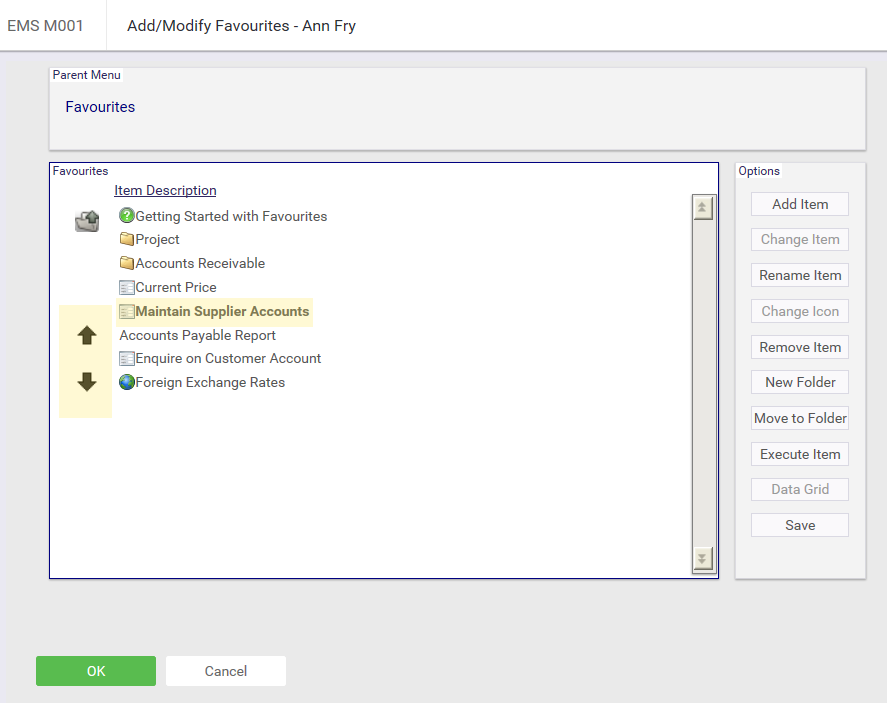
Figure 9: Reordering the Favourites Navigation Menu in Pronto Xi ERP SoftwareCreating a Custom Folder for Grouping Menu Items
Grouping of tasks into a folder allows for better organization for users that utilize many software functions. Note that you are unable to add items to a pre-defined Pronto Xi folder.
To add and populate new folders:
- Click NEW FOLDER. A new folder is added to the bottom of the menu listing and will be selected.
- Click RENAME ITEM.
- Enter a name for the folder.
- Select an existing favourite function to move into the new folder – or add a new favourite to move into the folder.
- Click MOVE TO FOLDER.
- Select the Folder Name from the list.
- Press ENTER. The item will move into the folder.
- Click the folder, to view the contents. Click RETURN TO PREVIOUS FOLDER (folder with upwards arrow icon) to move back in the folder hierarchy. Creating a folder hierarchy, that is, folders within folders is possible.
Selecting a Primary Navigation Menu in Pronto Xi
After edits to the Favourites Menu are complete, this menu can be set as the Primary Menu. Selecting a primary menu will display the chosen menu as the default menu in Pronto Xi upon entering the application.
- Navigate to: ORGANIZE FAVOURITES > SELECT PRIMARY MENU
- Select SET FAVOURITES AS PRIMARY MENU.
- Log off and log back in to Pronto Xi ERP for the setting to take effect.

Figure 10: Setting the Favourites Menu as the Primary Navigation Menu in Pronto Xi ERP SoftwareCopying a Favourites Menu between Pronto Xi ERP Users
Users with similar corporate roles and tasks can take advantage of a co-workers Navigation Favourites. System Administrators have the ability to copy a user’s favourites to another account using the User Access Control function (SYS M195).
From Pronto Xi ERP,
- Navigate to: ADMINISTRATION > SYSTEM ADMINISTRATION > USER AND COMPANY MAINTENANCE > USER ACCESS CONTROL.
- From the User List, select the User from which the Favourites Menu will be COPIED.
- Click USER COPY.
- In the Copy to User field, enter the user account name that will receive the Favourites.
- In Selection Options, enter N in all entries except for Copy User Favourites which will be marked as Y. (Refer to Figure 11)
- Tab through Company Selection. (Favourites Menu will be applied enterprise-wide.)
- Click OK. The copied favourites will now appear in the selected user’s menu.
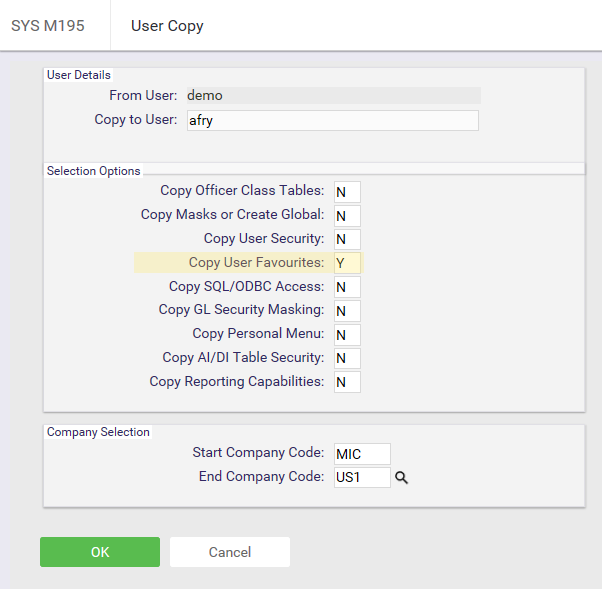
Figure 11: User Access Control – Copying Favourites between Pronto Xi Users
Important Note:
When Pronto Xi completes the copy, it will not overwrite menu items that are in the same sequence number position. To ensure a complete copy, delete all favourite items from the user account prior to completing the copy.As mentioned at the start of this article, manipulation of the Favourites Menu to suit the needs of users may seem simple, however, as consultants we still often see users drilling through the standard menu to execute tasks. Pronto Xi ERP’s Favourites Navigation provides a more organized and faster method to access daily tasks and can become a fundamental tool for users looking to improve productivity. Let’s see how many will now take a second look at taking the time to organize their Favourites!
Continue to visit our blog for more information about Pronto Xi and IBM Cognos reporting. PSA ERP consultants contribute tips and articles to our Insight page to help empower Pronto Xi users in completion of their daily tasks.
